Blog

  • Don’t starve your Lambda functions!

    Reducing Lambda memory does not always reduce Lambda cost.

    I recently tuned an AWS Lambda function that processes medical-report notifications received through Amazon SQS.

    This is not a minimal Lambda function. It runs on a PowerShell custom runtime and uses multiple Lambda layers, including:

    • the PowerShell runtime;
    • Firely SDK assemblies for parsing FHIR R4 messages;
    • AWS Tools for PowerShell;

    During a cold start, Lambda must create the execution environment, load the custom runtime, make the layers available, import the modules and load the .NET assemblies before processing the message.

    That matters because Lambda memory is also a performance setting. AWS allocates CPU in proportion to configured memory, so reducing memory can slow runtime initialisation and execution.

    The test

    I compared four memory settings using the same synthetic medical-report notification.

    For each setting, I collected four confirmed cold starts and measured:

    • billed duration;
    • initialisation duration;
    • maximum memory used;
    • billed GB-seconds.

    GB-seconds are the key cost measure because Lambda compute usage depends on both allocated memory and execution duration.

    The results

    MemoryAverage billed durationAverage GB-seconds
    384 MB13.83 seconds5.187
    512 MB10.88 seconds5.442
    624 MB8.77 seconds5.343
    768 MB7.29 seconds5.467

    Maximum memory use stayed close to 330 MB throughout, but execution became faster as the configured memory increased. Because AWS allocates CPU in proportion to Lambda memory (reference: Configure Lambda function memory – AWS Lambda), the results suggest that the workload benefited from the additional compute capacity rather than from additional usable RAM.
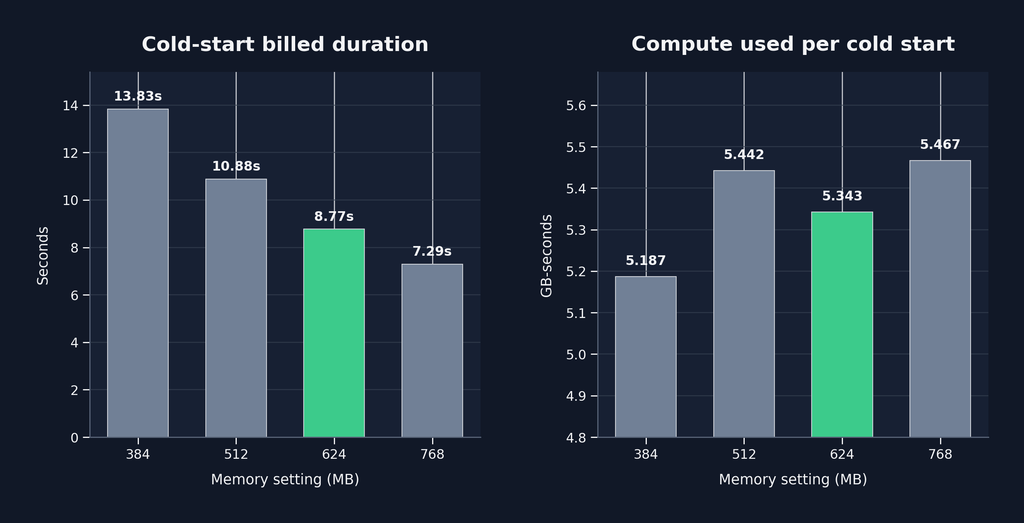
    The 384 MB setting produced the lowest GB-second figure, but it was approximately 58% slower than 624 MB for a saving of only around 3%.

    More unexpectedly, 512 MB was both:

    • approximately 24% slower than 624 MB;
    • approximately 2% more expensive in measured GB-seconds.

    Reducing memory had made the function slower without making it cheaper.

    At 768 MB, execution was faster again, but compute use increased slightly. For this asynchronous SQS workload, that additional speed was not valuable enough to justify the extra capacity.

    Why 624 MB?

    The 624 MB value was not originally selected as a carefully calculated target. It was simply a value reached while increasing memory during earlier testing.

    In hindsight, 640 MB would have been a more logical test point, because it is a multiple of 128 MB. However, 624 MB was the setting for which we already had operational and performance evidence, and the results showed it to be the best tested balance.

    The lesson

    Do not size Lambda functions using maximum memory consumption alone.

    This function using approximately 330 MB was not necessarily best configured with just a little headroom at 384 MB. Memory allocation also affects the CPU available for:

    • custom-runtime startup;
    • module imports;
    • Lambda layer loading;
    • dependency initialisation;
    • parsing;
    • serialisation;
    • application processing.

    Lamdba functions clearly need tuning once created. Don’t just ask if there’s enough memory to complete execution, instead:

    Which memory setting gives the best balance of execution time, compute usage and operational performance?

    For this function, the sweet spot was 624 MB.

    Sometimes the cheapest way to run a Lambda function is to stop starving it.
    Further references

  • Avid Pro Tools 2022.7 deployment notes

    Planning

    Downloading the install package for Avid Pro Tools is a 2.6GB zip file that contains many hidden files and folders, including the .msi package ‘Avid Pro Tools.msi’, some transforms for each language of the installer (e.g. ‘1033.mst’) and a file, ‘setup.ini’ that may be of use later.

    Depending on the licence, there are different sample packs and plug-in bundles offered by Avid alongside the main program. The plug-in bundle obtained for this installation was 3.8GB in separate zip files for each plug-in. Another 1.6GB was in the ‘Loopmasters Sample Pack 1.0’.

    Given the size and number of files included, a WIM installation was used to deploy this on MECM, via a network share for the WIM file, but with separate Powershell scripts for install and uninstall procedures within the MECM package folder. See here for more info; Use a WIM to Deploy Large Apps via ConfigMgr App Model (adminsccm.com).

    Depending on how Pro Tools is licenced, it may be preferable to install Pro Tools without the ‘Avid Link’ component. It does commercial licencing as well as connecting to a marketplace for third-party add-on content. This is included in the default Pro Tools installation, but can be added later if needed, with an up-to-date package available separately from Avid.

    Pro Tools installation

    All the files from the original zip package are included (in the WIM) with the following modifications.

    Blocking Avid Link

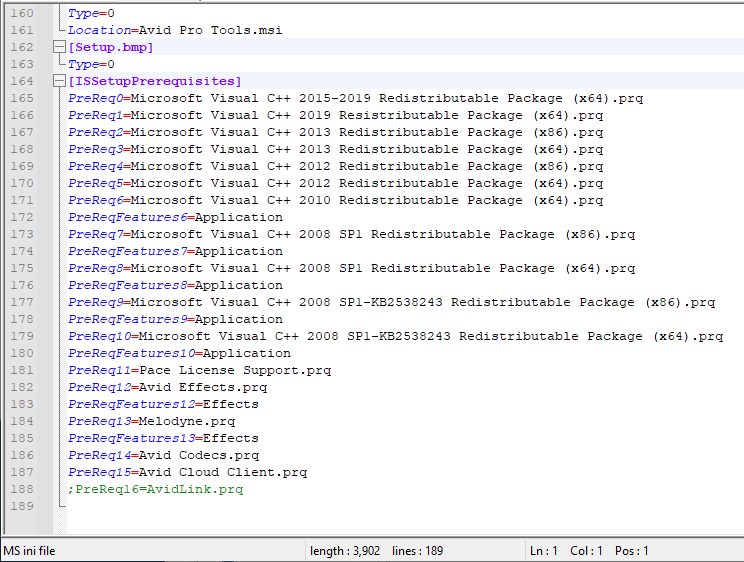
    Avid Link can be blocked by commenting out the last line of the [ISSetupRequisites] section in the setup.ini file…

    setup.ini – block Avid Link installation

    Fixing non-interactive installation

    The MSI package failed to install as ‘system’ until the following changes were made with a transform. Orca worked quick and easy for making the transform file, but other package editors are available. See here for how to get and use Orca to generate a transform; https://4sysops.com/archives/edit-an-msi-file-with-the-orca-msi-editor/

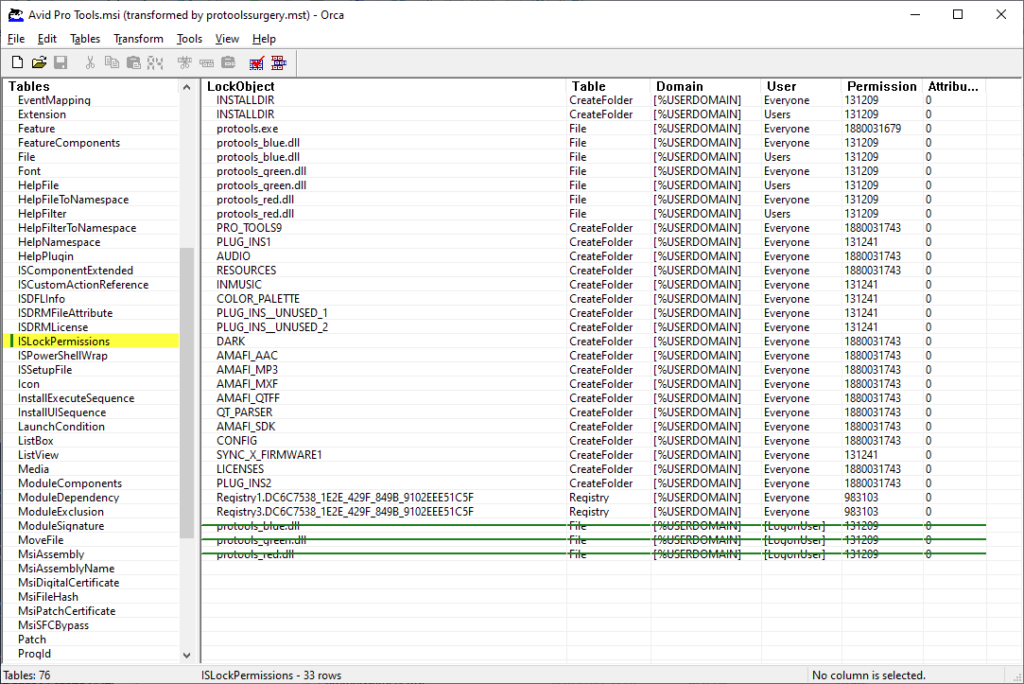
    The problem table entries were identified from InstallShield logs on the failed installations. Drop the following three entries from the ‘ISLockPermissions’ table…

    • LockObject: protools_blue.dll User: [LogonUser]
    • LockObject: protools_green.dll User: [LogonUser]
    • LockObject: protools_red.dll User: [LogonUser]

    Removing all users desktop shortcut

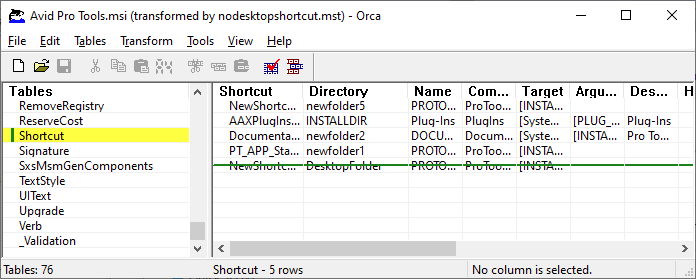
    While generating the transform (.mst) for the non-interactive install to work, the Desktop shortcut for Pro Tools can also be dropped. The following entry in the ‘Shortcut’ table…

    • Shortcut: NewShortcut Directory: DesktopFolder

    Scripting the install

    The full command to do the silent install is…

    setup.exe /S /v"/qn /norestart TRANSFORMS=<path to .mst files>

    Including the original language transform file for the ‘English’ installation (‘1033.mst’), the full command example…

    setup.exe /S /v"/qn /norestart TRANSFORMS=c:\temp\protools\nodesktopshortcut.mst;c:\temp\protools\protoolssurgery.mst;c:\temp\protools\1033.mst"

    Suggested Powershell code with a little error capture (this example shows the transforms all copied into the MECM package, including the unedited ‘1033.mst’ file)…

    $runthis = start-process -FilePath 'c:\temp\wimmountpath\setup.exe' -ArgumentList '/S /v"/qn /norestart TRANSFORMS='+$PSScriptRoot+'\protoolssurgery.mst;'+$PSScriptRoot+'\nodesktopshortcut.mst;'+$PSScriptRoot+'\1033.mst"' -PassThru -Wait
    if ($runthis.ExitCode -gt 0) {write-host "Error on installation"}

    Samples and Plug-ins

    The Avid Loopmasters Sample Pack is packaged with InstallShield, which should allow a /extract_all command to get the contents, but this didn’t seem to work without a setup.ini file to accompany the installer. However, the /b command did work to redirect the msi extraction to a temporary folder. For example…

    .\Avid_Loopmasters_Sample_Pack_1.0_Win.exe /b"c:\temp\loopmasters"

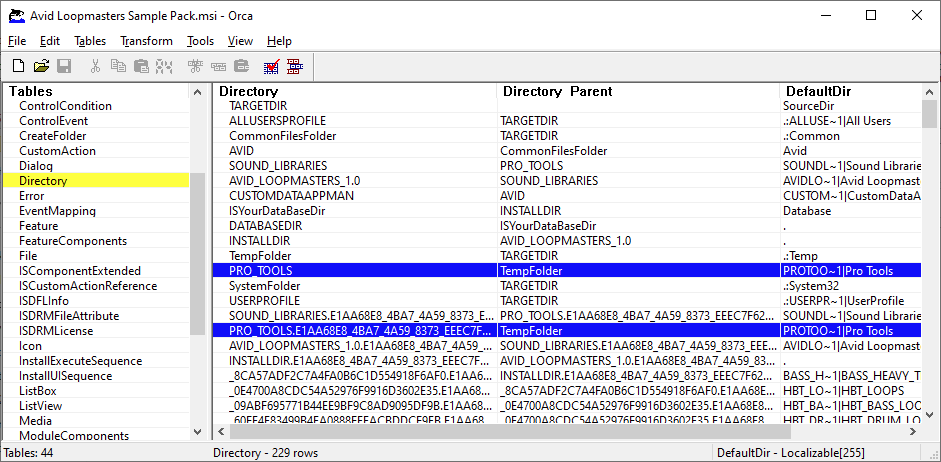
    The msi package will remain in the provided cache folder after cancelling the installation. Why do this when the InstallShield installer works silently? The package as provided from Avid was installing to a users temp folder rather than Program Files. This is a volatile location and not suited to a computer used by multiple users. Time to fix this with another transform…

    ‘Directory’ table with TempFolder install location, before transform
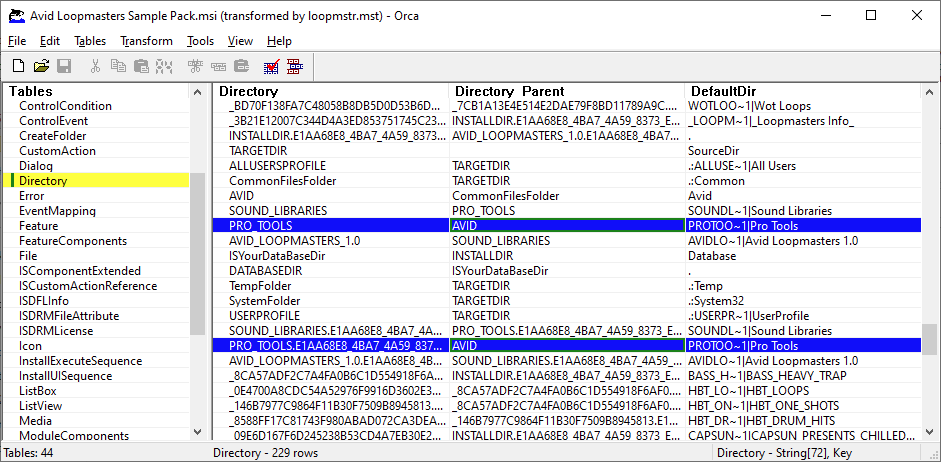
    ‘Directory’ table with AVID folder location redirected after transform

    The only change is setting the install directory to be ‘AVID’ instead of ‘TempFolder’. The msi package previously extracted can be deleted once the transform is made. The transform can be applied using the original InstallShield installer with the following arguments…

    Avid_Loopmasters_Sample_Pack_1.0_Win.exe /S /v"/qn /norestart TRANSFORMS=loopmstr.mst"

    The Plug-in Bundle is about 24 separate installers. Other than a bit of manual flattening out of the folder structure, this can be handled easily. Extract every zip file into a directory called ‘PluginBundle’ and check each one doesn’t have a sub-folder before getting to the somethingsomethingsetup.exe that is standard for these plug-in installers. Check each one, but an example is ‘First_AIR_Instruments_2018.3_Win’ which extracts to a ‘First AIR Instruments’ sub-folder. Move this content up a level. There’s maybe three or four to actually modify. These installers are fairly uniform.

    Installation can now be done in a loop…

    $allfolders = gci c:\temp\wimmountpath\PluginBundle\*
    foreach ($plugin in $allfolders) {
        $runthis = start-process -FilePath ($plugin.ToString())\(gci $plugin\*.exe -Name) -ArgumentList '/S /v"/qn /norestart"' -PassThru -Wait
        if ($runthis.ExitCode -gt 0) {write-host "Error on installation"}
    }

    Uninstall

    If you’ve come this far, uninstall shouldn’t be much of a trouble. Look out for ‘Melodyne 5’ which is one of the pre-requisite packages in the Pro Tools main installation. I recorded an uninstall and had to distribute the resulting .iss options file to cleanly uninstall.

    1. On a test machine, run the uninstaller with -r -f1"removemelodyne.iss" to make the file
    2. Lookup the standard uninstall commands from the registry in ‘hklm32\HKEY_LOCAL_MACHINE\SOFTWARE\Microsoft\Windows\CurrentVersion\Uninstall\{16DF894D-FC3F-4B87-908D-671E201CD7A8}‘ (this is the ‘WOW6432Node’ if you’re in regedit)
    3. When deploying the uninstall process, run the uninstaller with the standard arguments plus -s -f1"removemelodyne.iss" to silently uninstall